Guide: Improving LUGO Moon Wars Collector with YOTEY
November 4, 2024This guide is an introduction to the basics of YOTEY. Using step-by-step instructions, you will create your first work break-down in a plan, the main unit of project management in YOTEY.
The scenario
You are going to create a plan for improving an existing feature of an imaginary Web-application called LUGO Moon Wars Collector. This is a collection manager for small plastic figures related to classic sci-fi movies. The imaginary feature we are planning to work on is "figure randomizer", where variations of figures are generated from figure parts already in the user's collection. The improvement involves adjusting the generation algorithm to make new figures more varied and interesting. However, this is all a hypothetical example and the exact details do not matter in this guide.
0. Creating the project
You can skip to Step 1 if you already found out how to create a project or someone else in your organization already created one. A project needs to be defined for any work on LUGO Moon Wars Collector within YOTEY. The simplest way of doing this, especially if you just activated your new account (potentially in your new organization), is from the start here page.
- Click on the YOTEY logo in the top left corner.
- Then activate the project selector by clicking on "PROJECTS".

- Finally click the "New project" button.

This will take you to the new project page. Currently only a project title needs to be entered.
- Enter "LUGO Moon Wars Collector" as project title.
- Click the "Create" button.

This will initialize a new project and your browser will display the project page.

The project selector you used above is also available on this and every other project page. Instead now, it shows the currently selected project (title), that is, the one you just created. Clicking on it will activate the project selector again, where you can switch to another project or create yet another one.
1. Creating the first plan
Every new project is initially empty. This means that there are no plans defined within it. Observe how there is nothing listed under "PENDING PLANS" or "COMPLETED PLANS" on the project page.
You will now create a plan for improving the figure randomizer feature, as described in the scenario section.
- Click the "New plan" button.
A small plan editor appears.
- Enter "Improve random figure generator" as plan title.
- Click the "Create" button.

This will add the new plan to the project, which now looks as in the following figure. There are obviously still no completed plans, but the newly defined plan appeared under "PENDING PLANS".

It is recommended to give a plan an informative title which expresses the goal achieved when the work concludes. The title may be verb-oriented, like in the plan you just created, or feature/entity-oriented, for example "Next version of ..." and so on.
Another simple but powerful trick is to include pictogram symbols in plan (and other) titles based on some convention in your team or organization. For example, improvements, new features or bug fixes can all have their associated title pictograms. On Windows, using the Win + ; key combination we could have entered ⬆️ Improve random figure generator signifying an improvement, rather than some other kind of a plan.
Next, you are going to create a work break-down within the new plan.
2. The plan page
Still on the project page:
- Point the mouse pointer on the title of the "Improve random figure generator" such that the eye icon appears.
- Click on the plan title.
After this the browser will display the plan page.

The first thing to notice is that there is nothing there; after all, this is a newly created plan.
Before addressing that, notice that the project selector is yet again available on this and any other plan page. In addition to current project, the plan you are looking at right now is also visible. This second, new part of the breadcrumb indicator is called plan selector. By clicking on the plan title, the plan selector activates, allowing navigation to other plans of the same project.
Back to the contents of the plan. The big white empty space is the plan diagram and is currently empty. There are also no tasks in the "TASKS" list. A plan diagram shows items and their relations. You are now going to create the first item.
3. Creating items
Still on the plan page:
- Double-click anywhere in the white space of the plan diagram; this will activate an item editor.
- Enter "New algorithm" as item description.

Notice how the item editor appears exactly where you double click. This is because it also serves as a preview of where the final item will be placed in the diagram. Choose (relative) positions of items to express some logical structure of the work break-down.
- Click on "Create item" in the item editor.

Now your new plan contains the first item. Items can be anything you want which helps to structure and organize your work. They can be very concrete or more abstract and mixing different "kinds" of items in a plan is especially powerful. Here are some suggested item categories:
- concrete technical artifacts;
- packages of related work;
- goals;
- end-products or deliverables;
- risks;
- alternatives;
- people;
- physical objects;
- ...
In our case, the new figure generation algorithm is a technical artifact of software design. However, these is much more to do so we proceed with expanding the work break-down with more items.
- Ensure you did not click on the item created above; click on it again if you did.
- By double-clicking in the plan diagram, add more items as in the following figure.

The new algorithm, represented by its own item, is supposed to be part of the back-end of the LUGO Moon Wars Collector application. However, there is more work to be done in the back-end, so we created a separate item for that. We could have modelled all work in the back-end with a single item, but separating the algorithm emphasizes it as the core of the improvement.
Furthermore, we are expecting some work in the front-end, which also becomes its own item.
You are now going to add another item, of another "kind", as mentioned above.
- Add an item called "Phase 1".

The "Phase 1" item does not represent a technical artefact (back-end, front-end, etc.), but rather an organizational aspect or effort for the team. Namely, in order to reduce risk, we are planning to deploy the new algorithm and related changes first alongside the existing feature as-is and roll out the improvement gradually, finally removing the old implementation in the second phase. There is more to this plan, but first let's make both phases explicit by defining the second phase as yet another item.
- Add yet another item called "Phase 2".
The diagram now looks like this:

Notice, how the plan diagram "flows" from left to right, at least in the example figures. This is intentional because you have a clear idea on the sequence of work and possibilities of work division between team members. In particular, phase 1 must happen first and phase 2 after that. However, the diagram and the plan as a whole does not reflect this and other sequences yet. Next you are going to address this by extending the plan with relations.
4. Defining relations
In YOTEY, relations can be defined between items. Currently a relation has a free interpretation, so you can express anything you want by defining a relation between two items. Some relations have very straightforward meaning, for example between phase 1 and phase 2.
- Select the "Phase 1" item by clicking on it once.
- While holding the Ctrl key, click on the "Phase 2" item.
An arrow denoting a relation appears between the two items in the diagram:

How about the other items? Let's say that the front-end team needs the back-end team to at least has some initial version of the required changes to the HTTP Web-service. This does not mean that all work on the front-end is necessarily blocked by the back-end. However we still find it important to express that all work on the back-end can only be finished after all work on the back-end. This reasoning shows, that choosing the direction of a relation is a creative process which deserves some thought and provides interesting modeling possibilities (to be enhanced in future releases of YOTEY).
- Select the "Back-end" item by clicking on it once.
- While holding the Ctrl key, click on the "Front-end" item.

Let's see another example of a relation with its own meaning. The new algorithm and back-end items are clearly related, as discussed above. It seems natural to define a relation between them, but what should its direction be? One possible and completely valid interpretation is that the algorithm is part of the back-end. Another interesting possibility is that other (remember, we split off the new algorithm on purpose) tasks in the back-end "contribute" to having a new algorithm. In the next step, define a relation in the direction of your choice.
- Define a relation between items "Back-end" and "New algorithm".
For this guide we chose the "contributes to" meaning, resulting in the following diagram:

Finally, phase 1 needs the new algorithm, otherwise there is simply nothing to validate in the first place.
- Define a relation between items "New algorithm" and "Phase 1".

Just by looking at this plan diagram the whole intention is already very clear! However, up till now you only defined items, which are high-level technical artifacts, packages of work, etc. An actual work break-down is a bit more than that: items together with associated tasks. You are going to define tasks next.
5. Defining plan tasks
In YOTEY, tasks are always associated with items. The core of our plan is obviously the new figure generation algorithm, so let's create first tasks for that item.
- Select the "New algorithm" item by clicking on it.
- Click the "+ Task" button in the "TASKS" section.
- Enter "Brainstorm about the new idea" in the task editor which just activated.
- Click the "Add" button in the task editor.

This creates the very first task in the plan. The task editor remains active and you can keep adding tasks to the item quickly by typing in a task description and pressing the Enter key. The task editor can be dismissed using the Esc key, besides the obvious "Cancel" button.
- Add another task "Implement the algorithm in the model layer" as described above.
- Add yet another task "Extend the test suite with new cases".
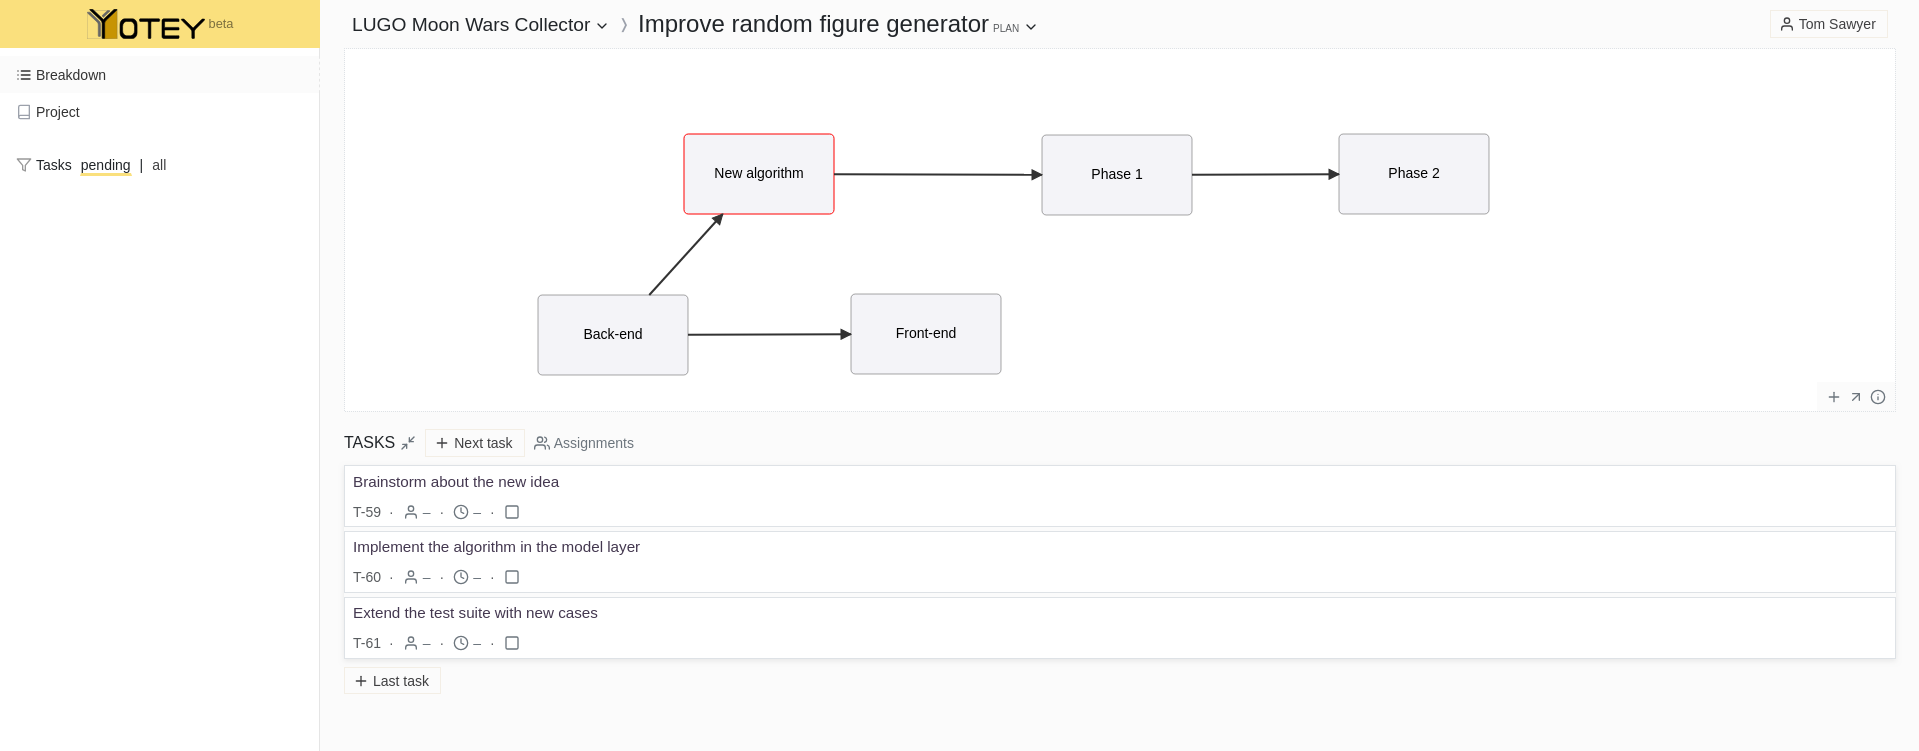
The "New algorithm" item now has three tasks:

You are now going to add tasks to other items.
- Select the "Phase 1" item by clicking on it.
- Define a task with the description "Deploy to production".
- Select the "Phase 2" item by clicking on it.
- Define a task with the description "Remove the old implementation".
- Deselect the "Phase 2" item by clicking on it again; make sure no other item is selected.
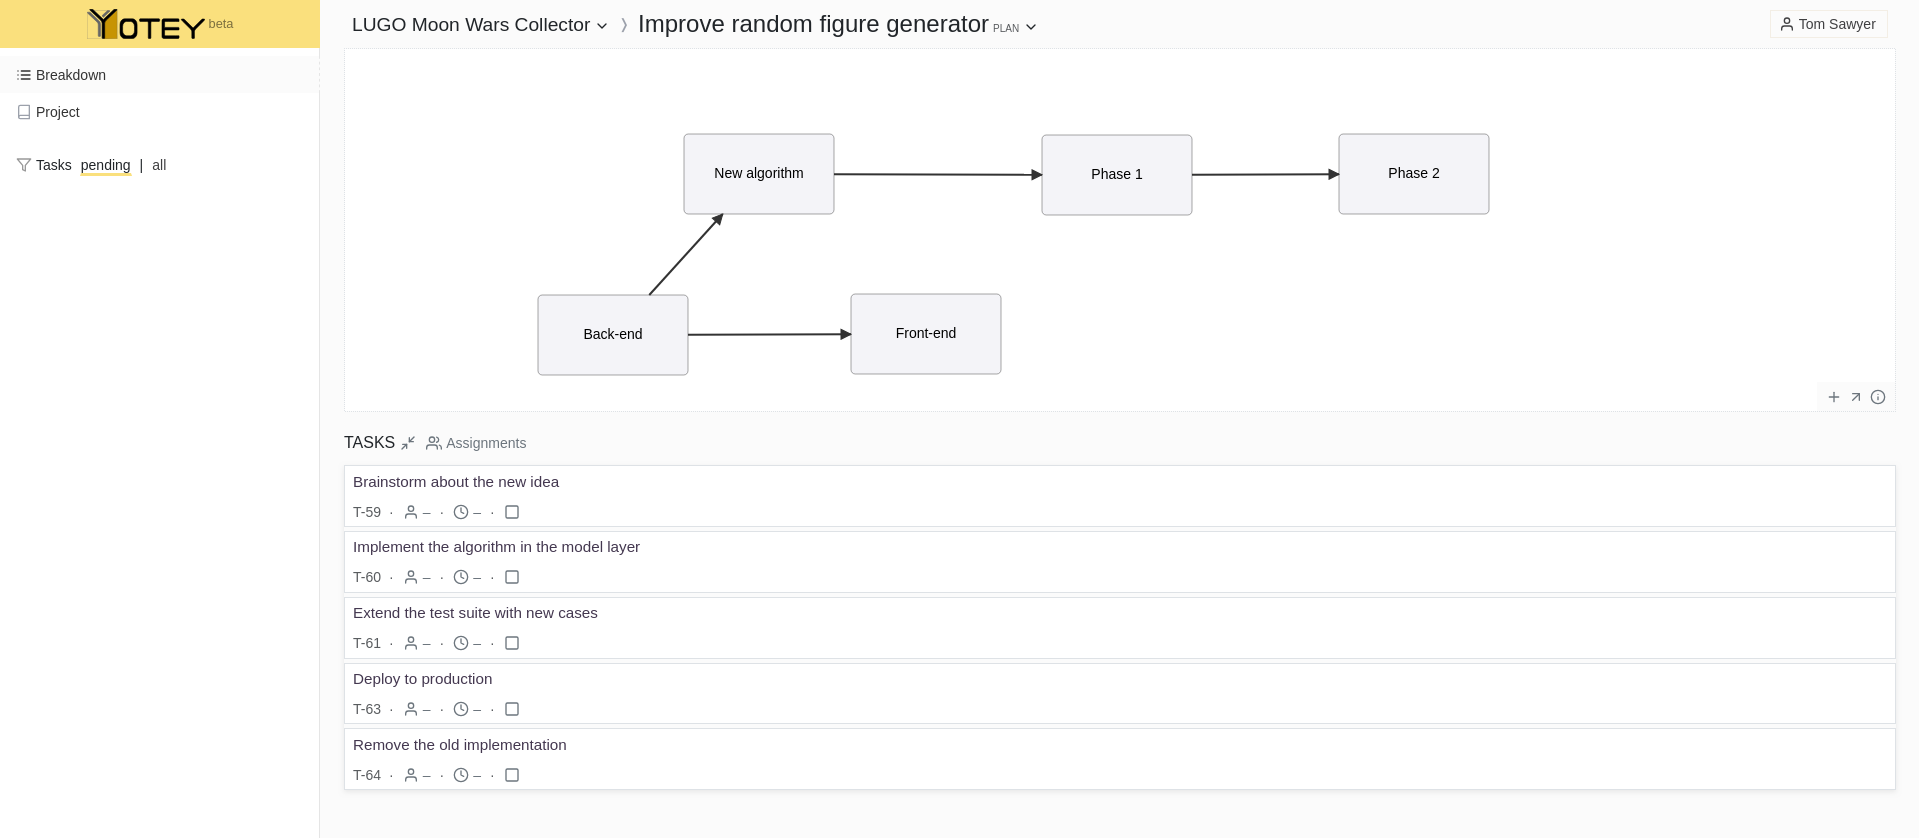
The complete work break-down should look like this now:

Realistically, there would be more items and possibly many more tasks, depending on how fine-grained you choose to model the work. However, this set of tasks is enough to illustrate the next interesting point: all "New algorithm" tasks precede all "Phase 1" tasks, finally followed by all "Phase 2" tasks. In other words, the direction of relations between items determine the relative ordering of their tasks in the plan. Use this, together with your own meaning of relations, to visually define what sequence of work makes the most sense. There is more to say about this, but this will be covered in future articles and/or reference documentation.
One last thing to mention here is that tasks can be rearranged by drag-and-drop, but only within one item.
6. Making the plan more complete
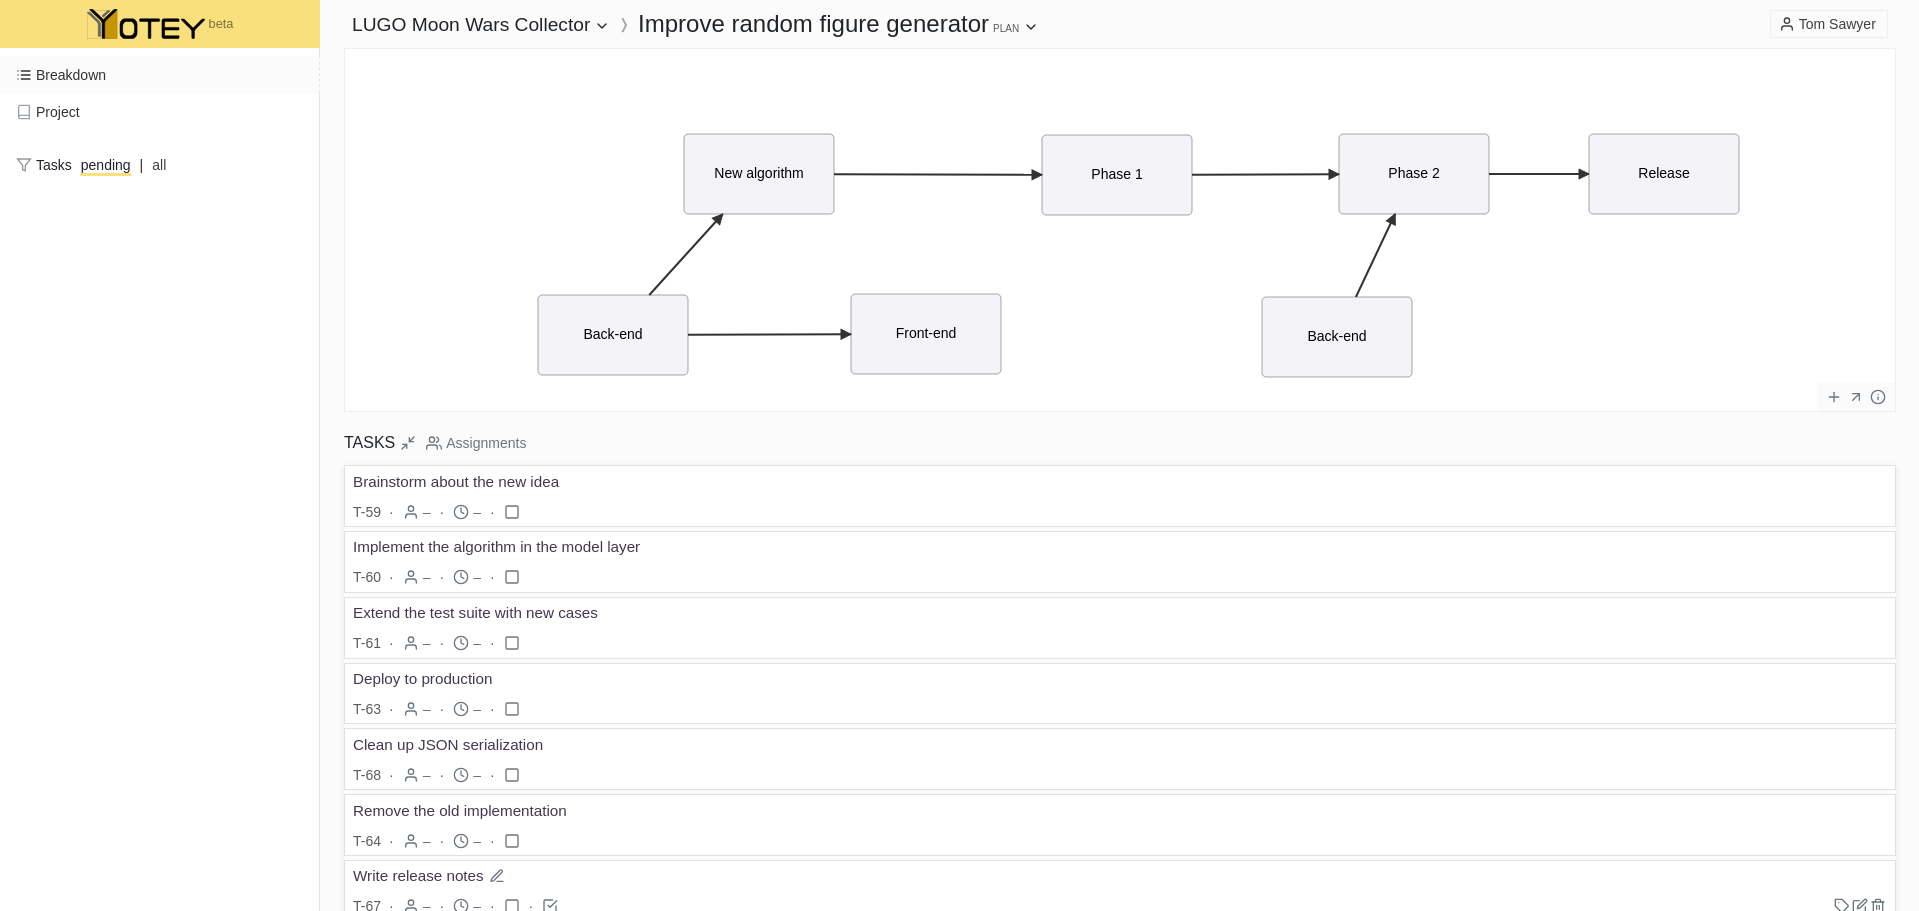
If you want to, you can experiment by adding more items and tasks to the plan at this point. The following figure shows our example plan extended in an interesting way:

Specifically, there are two "Back-end" items now! This is one of the creative work break-down modeling "tricks" which are useful when working with YOTEY. It is tempting to think that any "entity" should occur only once as a single item in a diagram, but it is actually very useful to depart from this rule once in a while. By adding the second "Back-end" item in relation to "Phase 2", we make it explicit that work on the back-end needs to happen twice, in both phases of the improvement. Also here, we chose the relation to mean "contributes to" or "is part of" by giving it this particular direction.
7. Tracking progress
Up till now you have been creating a work break-down within a plan. Now it's time to make some (imaginary) progress on the improvement. As you might expect from a project management tool, while work goes on, tasks can and should be marked as completed.
- Locate the task "Brainstorm about the new idea".
- Point the mouse pointer on the task.
- Click on the checkbox icon which appeared below the task title.

This will mark the task as completed. Depending on currently active filter, the task might have disappeared from the list immediately. Let's see whether we can find it again and what it looks like now.
- Make sure no item is selected. If an item is selected, click on it to deselect it.
- Locate the plan filter in the left vertical pane.
- Beside the "Tasks" filter fragment, click on "all".
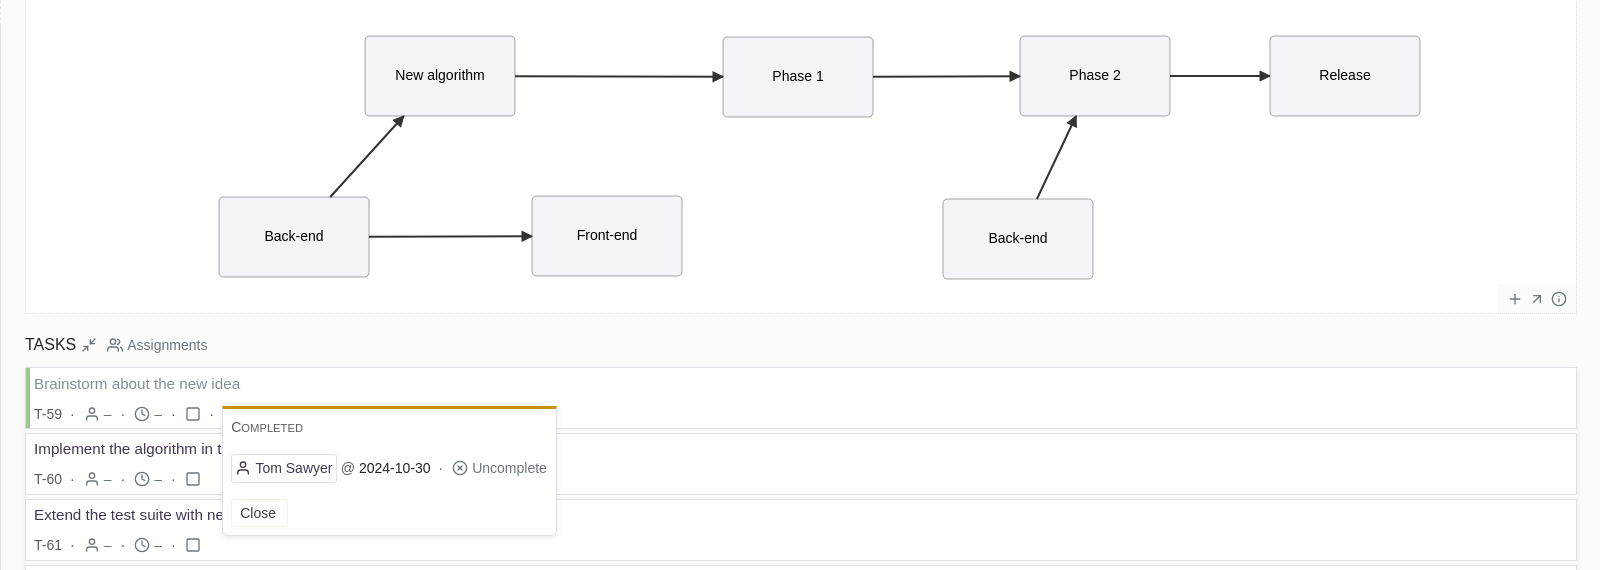
The task which you completed in the previous step should appear again in the "TASKS" area. Only this time, the green border indicates its completion status.

In case the task was marked as completed erroneously, it is possible to "uncomplete" it. In the same completion widget (see below), you can also see when and by whom the task was completed.
- Locate the same completed task again.
- Click on the checkbox item which now has an ellipsis (three dots) next to it.
- Optionally, click on "Uncomplete" in the "COMPLETED" widget which just opened.

If you chose to uncomplete the task, it will revert back to its pending appearance, losing the green completion indicator. Of course, it can be completed again later.
Conclusion
This concludes the basic guide for creating a plan in YOTEY. We covered the following parts and notions of the application:
- projects
- project selector
- project page
- plans
- plan page
- plan selector
- plan diagram
- work break-down
- item
- relation
- task
- completion
- plan filter
Undoubtedly, you noticed many things and possibilities which were not mentioned at all. As this is a basic how-to-start guide, many topics are deliberately not covered to keep it focused. These are, among others:
- task tags
- task assignments
- other filtering possibilities
- estimations and time tracking for tasks
- completing plans
- inviting new users
- ...
These and other topics will be explained in future articles and reference documentation. Also, YOTEY is (always) in active development, so some features are still incomplete, imperfect or even missing!
We would love to hear from you if you have any feed-back or questions regarding this guide, your impressions of working with YOTEY, suggestions, critique, feature requests or anything else. Please send us a message by using the contact info at the bottom of this page at any time.
Happy creating!